4-in-1 soil tester: how to measure pH, moisture, light and temperature — and why the readings go wrong
How to prepare the soil and a 4-in-1 meter, which mode to use for pH and moisture, how to read the DRY–WET and LOW–HGH scales, when and how to polish the probe safely (with a diagram), 12 common mistakes and a list of pH-fussy crops.

A 4-in-1 soil tester uses a single probe to show soil moisture (5 levels from DRY+ to WET+), soil temperature, acidity (pH from 3.5 to 9.0 in 0.5 steps) and the light level at the spot (9 levels from LOW- to HGH+). Most wrong readings come from three things: the soil is hard or dried out, the probe is dirty or has an oxide film, or the probe isn’t in good contact with the soil. Before measuring, loosen the soil — and for pH also moisten it and wait 20–30 minutes — push the probe in 10–15 cm deep and take 3–5 readings in different spots. A new probe doesn’t need polishing — just wipe it with a cloth; fine sandpaper is only needed later, once the metal has dulled. In moist soil the pH reading is good enough for practical work in the vegetable patch and garden; for demanding crops you can refine it with a pH meter in a soil-water slurry.
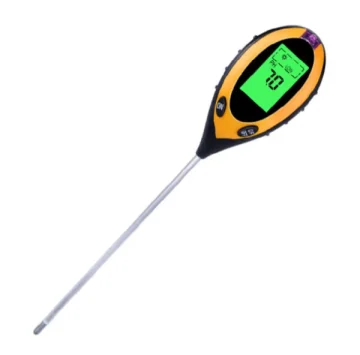
The yellow egg-shaped soil analyzer with a long probe and an LCD screen is one of the most popular tools for vegetable beds, greenhouses and pot plants. It measures four things at once, but it has its own rules: if you don’t know them, it will show “always pH 7” or “dry” in a pot you have just watered. Below is how to prepare the soil and the meter, how to measure and read the scales, how to clean the probe safely, which mistakes happen most often and when to double-check pH. The guide applies to the 4-in-1 soil analyzer without a battery, to the same tester with a battery included, and to most similar meters from other brands.
What a 4-in-1 tester measures and how accurately
The probe, about 20 cm long and 5 mm thick, carries the moisture, pH and temperature sensors; the light sensor sits in a small window at the top of the housing. Meters of this type use these scales:
| What it measures | How it shows it | How far to trust it |
|---|---|---|
| Soil moisture | 5 levels: DRY+, DRY, NOR, WET, WET+ (from very dry to very wet) | good enough to decide whether to water |
| Light | 9 levels: LOW-, LOW, LOW+, NOR-, NOR, NOR+, HGH-, HGH, HGH+ | good for comparing spots; these are relative levels, not lux |
| Temperature | −9 to +50 °C, 1° steps, switchable to °F | good, as long as the probe has time to settle |
| Acidity (pH) | 3.5 to 9.0, shown in 0.5 steps; “Lo” or “HH” means out of range | in moist soil — good enough for practical work, in 0.5 steps |
For looking after a vegetable patch, garden and pot plants this accuracy is enough: the tester tells you when to water, whether a plant gets enough light, whether the soil is warm enough for sowing and whether the plot’s acidity suits the crop. The key condition for pH is moist, loosened soil and a clean probe.
Getting the meter ready before the first measurement
- Fit the battery. The compartment is on the back of the housing. Meters of this type run on a single 9-volt battery (6F22, also called PP3) — with the battery-free version you buy it separately. It’s best to check the battery type printed in the compartment before you buy one.
- Take the protective cap off the probe. It sounds obvious, but “the meter shows nothing” is quite often just a capped probe.
- Wipe the probe. A new probe doesn’t need polishing: the metal is clean, so just wipe it with a dry, clean cloth. Polishing with fine sandpaper is only needed later, once the probe has dulled — how to do it safely is described below.
- Don’t touch the probe with your fingers after cleaning: skin oils worsen contact with the soil.
Buttons and modes
- ON — turns the meter on. After a few minutes without use (usually 5 minutes) it switches itself off to save the battery.
- C/F · OFF — a short press switches between Celsius and Fahrenheit; holding it for about 3 seconds turns the meter off.
- PH / TEMP switch on the back of the housing: in the PH position the meter measures acidity; in the TEMP position it shows soil moisture and temperature at the same time. The light level is shown in both modes.
Prepare the soil: it should be loose, not hard as rock
The probe is thin — only 5 mm — and is made for ordinary garden soil. It won’t go into trodden, dried-out or clay soil that is hard as rock, or it bends, and where it does go in it touches the soil at only a few points. Because of poor contact the tester shows DRY in moist soil, gets stuck at around pH 7 or shows “HH”. So prepare the measuring spot first:
- Loosen the soil at the measuring spot to a depth of 10–15 cm with a garden fork, trowel or stick. In a pot, use a thin stick and work carefully so you don’t damage the roots. Remove stones and break up clods.
- Moisten the soil if it is dry (the tester shows DRY or DRY+) or if you are measuring pH: water the spot, preferably with rain or distilled water, and wait 20–30 minutes for the water to soak in evenly. The soil should be moist, not muddy.
- Insert the probe and press the soil gently around it so it grips the probe with no air gaps.
How to measure soil moisture and temperature
- Set the switch to TEMP.
- Push the probe vertically 10–15 cm into the loosened soil, where most of the roots are. In a pot, go roughly halfway between the stem and the rim; in a large pot (over 30 cm across), a third of the way from the stem to the rim. Don’t push it in right next to the stem, so you don’t damage the roots.
- Press ON and wait until the readings stop changing. Temperature takes longer — give the probe a minute or two to warm up or cool down to the soil temperature.
- Read the moisture level and temperature. Take 2–3 more readings in other spots, especially in a garden bed where the soil is uneven.
- Pull the meter out by the housing, not by the probe, and wipe the probe dry straight away.
How to measure soil acidity (pH)
- Prepare the soil: loosen it, moisten it and wait 20–30 minutes. This kind of meter measures pH only in moist soil.
- Check the probe: it should be clean and dry. If it is no longer new and has dulled, polish it (see the next section).
- Set the switch to PH, push the probe in vertically 10–15 cm deep, press the soil around it and press ON.
- Wait until the number stops changing and write it down.
- Wipe the probe and repeat in 3–5 spots across the bed. Go by the value that comes up most often, not by a single reading.
How to clean and polish the probe without damaging it
A new probe doesn’t need polishing. Before the first readings just wipe it with a dry cloth, and after every reading wipe it clean and dry. Polishing is needed later, as the metal oxidises. Signs that it’s time:
- the probe has dulled, or dark or rusty spots or a film have appeared;
- pH is stuck at one value even in moist, loosened soil, and moisture reads DRY where the soil is wet;
- the meter has been lying around without its cap or somewhere damp.
With regular use that is typically once every few weeks. Don’t polish “just in case” before every reading: unnecessary sanding thins the metal.
What you need: a small piece of fine sandpaper, 800–1000 grit (600 at a pinch; nothing coarser), about 3×5 cm, or a soft abrasive pad with no metal fibres, a dry clean cloth and a little clean water, preferably distilled.
- Turn the meter off and clean the soil off the probe. Rinse or wipe off the soil and dry the probe: grains of sand under the sandpaper leave deep scratches.
- Hold the meter by the housing with one hand and support the probe with the fingers of your other hand next to the spot you are sanding. Don’t press the probe against the table or pull it sideways — it is thin and bends easily where it enters the housing.
- Fold the sandpaper in half with the abrasive side in and pinch it around the probe with your thumb and index finger, like a clothes peg.
- Lightly stroke along the lower 10–12 cm of the probe — from the middle towards the tip — 3–5 times, turning the meter a little each time so you go all the way round. Don’t press: the aim is to remove the film, not the metal. An even, bright matt sheen is enough.
- Don’t sand the tip — just wipe it. Leave alone the spot where the probe comes out of the housing and the upper part of the probe that never goes into the soil.
- Wipe the probe with a cloth dampened with clean water to remove the sanding dust, then dry it.
- Don’t touch the polished part with your fingers. If you’re not measuring straight away, put the cap on.
How to read the results
Moisture. DRY+ and DRY — the soil is dry and most plants need watering. NOR — normal, no watering needed. WET and WET+ — the soil is wet, don’t water; a pot that stays at WET+ needs its drainage checked, because overwatering rots roots. Water succulents and cacti when the tester shows DRY or DRY+; moisture-loving ferns and tropical plants do best between NOR and WET. Small pots dry out faster, so check them more often.
Light. Point the sensor window at the light source where the plant stands (or will stand), and don’t shade it with your hand or head. LOW- … LOW+ is shade (for shade-tolerant plants and ferns), NOR- … NOR+ is moderate light for most houseplants, HGH- … HGH+ is bright sun for tomatoes, peppers and succulents. Compare spots at the same time of day; under grow lights the levels are only indicative, as the sensor is designed for sunlight.
Acidity. 7 is neutral soil, below 7 is acidic, above 7 is alkaline. Most plants are happy at pH 6–7, but some crops need different soil:
| Crop | Preferred soil pH (approx.) |
|---|---|
| Blueberries, rhododendrons, azaleas | 4.5–5.5 |
| Hydrangea with blue flowers | below 5.5 (in alkaline soil it flowers pink) |
| Potatoes | 5.0–6.0 |
| Strawberries | 5.5–6.5 |
| Tomatoes, peppers, cucumbers, carrots, onions | 6.0–7.0 |
| Cabbage, beetroot, garlic | 6.5–7.5 |
Crops that are fussy about acidity — keep an eye on pH for these:
- Acid-lovers (pH 4.5–5.5): blueberries, cranberries, lingonberries, rhododendrons and azaleas, heather and other heaths, hydrangeas with blue flowers.
- Can’t stand acidic soil (pH 6.5–7.5): cabbage (gets clubroot in acidic soil), beetroot, garlic, asparagus, alfalfa.
- Potatoes like slightly acidic soil (pH 5.0–6.0): liming before planting causes scab on the tubers.
Acidic soil is raised with garden lime or dolomite powder; alkaline soil is lowered with sphagnum peat, pine needle mulch or acidifying fertilisers. Rates depend on the soil type — follow the product’s instructions, change pH gradually and re-test no sooner than a few weeks later: soil responds slowly.
Why the tester reads wrong: common mistakes
| What you see | Likely cause | What to do |
|---|---|---|
| Screen won’t turn on | no battery, a flat battery or a loose connector | fit a fresh 9 V battery and check the connector |
| Battery icon, dim screen, jumping numbers | low battery | replace the battery |
| The probe won’t go in or bends | the soil is hard, dried out or clay, with stones in it | loosen and moisten the spot, wait 20–30 min, try another spot |
| pH “always about 7” or never changes | dry or hard soil, probe still capped, not deep enough or covered with a film | loosen and moisten the soil, wait 30 min, push the probe 10–15 cm deep; if the probe has dulled, polish it |
| “Lo” or “HH” on the screen | value out of range (pH 3.5–9.0, temperature −9…+50 °C) or no contact with the soil | press the soil around the probe and measure in another spot; if it repeats, verify pH another way |
| DRY+ in a pot you have just watered | air gaps around the probe, stones, water ran down the side of the pot | press the soil around the probe and measure nearer the centre |
| WET+ right after feeding | fertiliser salts or fertiliser spikes near the probe | measure away from fertiliser, a few days after feeding |
| Every reading gives a different number | uneven soil: stones, organic matter, clods | loosen the soil, take 3–5 readings and use the typical value |
| Odd readings after repotting | fresh soil hasn’t settled or moistened evenly yet | give the soil a few days to settle after watering |
| Readings change near the wall or bottom | the probe touches the pot wall, the bottom or a metal object | measure nearer the centre, away from metal (wire, metal pots) |
| Temperature equals air temperature | the probe isn’t in the soil or hasn’t settled yet | push the probe deeper and wait 1–2 minutes |
| Light shows LOW by the window | sensor shaded by your hand, tinted glass, dusk | keep the window clear, measure in daylight and compare at the same time of day |
How accurate the pH reading is and when to check it separately
In moist, loosened soil with a clean probe, the tester’s pH reading is good enough for practical work in a vegetable patch, garden or greenhouse — in 0.5 steps. That’s enough to tell whether the soil is acidic or alkaline, whether it suits a crop and whether you need to lime or acidify. The biggest influences on the result are dry or hard soil, a film on the probe and poor contact, so measure in moist soil and take 3–5 readings.
It’s worth refining pH to tenths when you grow fussy crops with a narrow range (see the list above), plan to lime a large plot, or readings differ a lot between neighbouring spots. In that case test the soil the way labs do, in a soil-water slurry:
- Take soil from 10–15 cm deep in 5–10 places across the plot, remove stones and roots and mix well.
- Mix one part soil with two parts distilled water (by volume) and stir vigorously for a minute.
- Let it settle for 15–30 minutes until the liquid above the sediment clears.
- Measure the liquid with a calibrated pH meter (0.01 pH resolution) or an indicator strip with 1 pH steps.
For how to set up a pH meter before this test, see “How to set up and calibrate a pH meter”; for how strips compare with a meter, see “pH strips or a pH meter: which to choose”. Labs often also report a “salt” pH (measured in potassium chloride solution), which is usually a little lower than water pH, so compare your readings with the water pH. For large areas and precise fertiliser planning, order an agrochemical soil analysis.
Care and storage
- Wipe the probe clean and dry after every reading — leftover soil and moisture oxidise the metal.
- Polish the probe only when it has dulled, not before every reading (see the section above).
- Don’t leave the probe in the soil longer than you need for a reading: the meter isn’t meant for continuous monitoring.
- Don’t bend the probe, don’t loosen or dig the soil with it and don’t pull the meter out by the probe.
- Store the meter dry, with the cap on the probe. For winter or long storage, remove the battery so it doesn’t leak.
- Don’t drop it and don’t take the housing apart.
Questions and answers
What battery does a 4-in-1 soil tester need?
Meters of this type run on a single 9-volt battery (6F22 / PP3). With the battery-free version you buy it separately; the kit version already has one in the box. Check the type printed in the battery compartment before buying.
Do I need to polish a new probe?
No. Just wipe a new probe with a dry, clean cloth. Polish it with fine sandpaper (800–1000 grit) later, once the metal has dulled or a film has appeared — lightly, only the lower 10–12 cm, without touching the tip.
Why does the tester always show pH around 7?
Usually because the soil is dry or hard, so the probe has poor contact. Loosen and water the spot, wait half an hour, push the probe 10–15 cm deep and press the soil around it. If the probe is no longer new and has dulled, polish it.
Can I use the tester to check the pH of water or a nutrient solution?
No. The probe is designed for soil only; in liquids it reads incorrectly and wears out faster. For water and solutions you need a liquid pH meter or indicator strips.
How long should the probe stay in the soil?
Until the readings stop changing: for moisture and pH that’s usually a few seconds to a minute, for temperature 1–2 minutes. Don’t leave it longer, and wipe the probe dry after each reading.
Why does the tester show DRY in a wet pot?
There are air gaps around the probe, it is touching a stone, or the water ran down the side of the pot without wetting the middle. Press the soil around the probe and measure nearer the centre of the pot.
What’s the difference between the battery-free analyzer and the tester with a battery?
Only what’s in the box: the meter is the same, but in one version you buy the battery separately — handy if you already have a 9 V battery.